
Storyline 360 is one of the Articulate flagship eLearning authoring tools. It’s simple, elegant and user-friendly, but it does not have built-in timers except for its quizzes. Since the release of Storyline 1, many designers in-the best community in the world- the eLearning Heroes Community have shared creative ways of simulating timers for use in games or any slide in a course. I’ve written about this topic before, but recently figured out what seems to be the best approach to achieve a 4-digit countdown timer. This post shows you how to do it.
Timer Ingredients
The ingredients for creating your Storyline timer include:
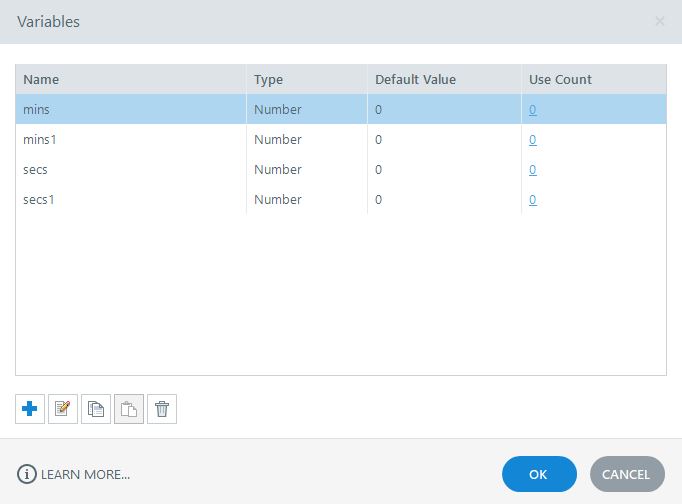
- Four timer number variables
- Three “counter” number variables
- 10 to 13 triggers-depending on how much control you want over the timer
- One off-stage shape with a motion path loop
Create number variables
The first part is to create the timer number variables “mins1”, “mins”, “secs1” and “secs”.
Referencing variables
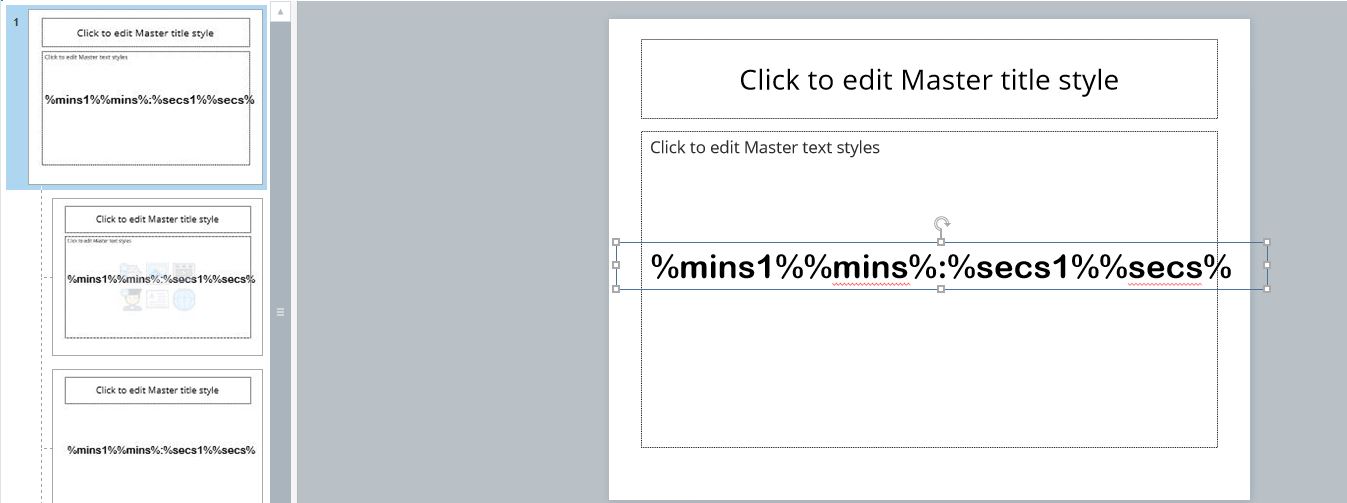
After the variables are created, they are not yet visible to users until they are referenced or “called” in Storyline. In this case we want to reserve a space on the top of every slide to display the timer. To reference the variables:
- Click “View>Slide Master”
- Click “Insert>Text Box” and drag your text box over the master slide so the timer shows on every slide
- Click “Insert>Reference” and select the “mins1” variable
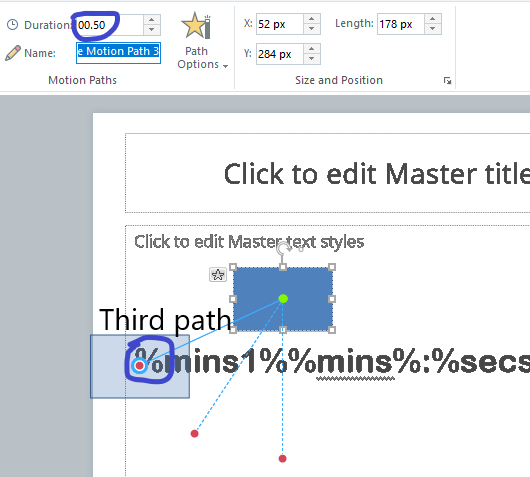
- Type the rest of the variables after the “mins1” variable as seen in the image below
- Add a colon symbol between the “mins” and “secs1” variables
Set up the counter variables
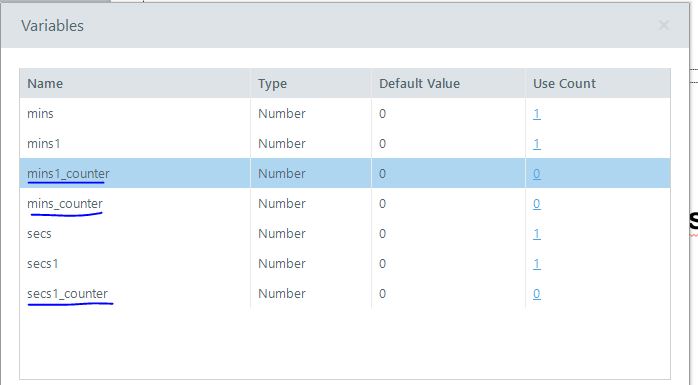
This timer setup uses three number variables which are named “counter” variables. These variables are used to validate when the “mins1”, “mins” and “secs1” variables need to change according to their single digit counterparts i.e. “mins” and “secs” variables. Therefore we want to create a “secs1_counter”, “mins_counter” and “mins1_counter” variables.
Setting up the Motion Path loop
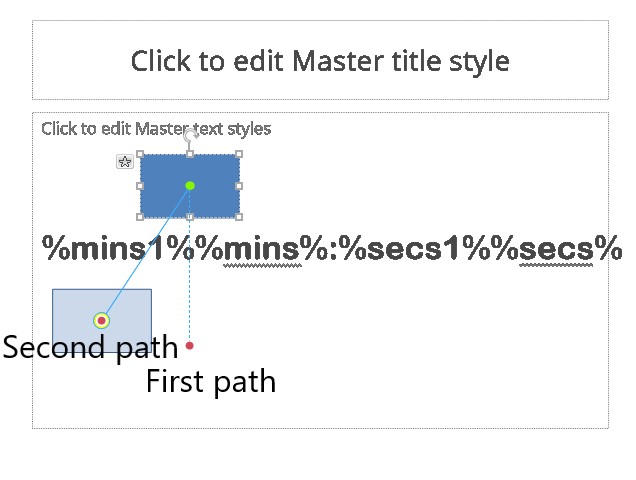
A motion path loop is the concept of setting up any object i.e. shape or image in a loop of animation/motion paths. You should still be in the slide master view, if not, get there.
- Insert>shape, pick a rectangle shape and place it on the slide
- Animations>Add Motion Path>Lines
- Click on the red end (stopping point) of the animation path
- Press CTRL+D to duplicate the path
- Click on the red end again and drag it to the left
You should now see two paths as seen below. If not, repeat steps 3 through 5.
If everything looks good, repeat steps 3 through 5 again to add a third motion path. This third path will be used as the STOP event for the timer. On a countdown timer, we want the timer to stop at zero.
Motion path loop triggers
So far, we just have a shape with motion paths and this only creates one trigger which will move the shape once on the FIRST path. Therefore, we need to give Storyline instructions to loop motion paths ONE and TWO consecutively.
- Click once on the off-stage area to deselect all items
- Click on the Rectangle trigger on the trigger panel once (it should be the only trigger thus far)
- Click on copy trigger and paste trigger twice
- Double-click one of the new triggers to edit its properties to ” Move Rectangle1 on Animation Path 1 when animation completes, Animation Path 2″
- Double-click the other trigger and edit it to match “Move Rectangle1 on Animation Path 2 when animation completes, Animation Path 1” i.e. the opposite of the previous one.

Now, that we have a shape with a motion path loop, let’s adjust the speed of the animations. The default is two seconds. However, our loop needs to be one second long. To do this click on the shape and the in the “Duration” field change the value to 1. The last thing to do is to make our stopping path or path number 3 faster. This is because once we move our shape on that path it will be faster than the others and stop the countdown. Click on the red end of the third path and change the duration value to .5 seconds. After all this, you can move the shape off the stage so it’s not visible to users.
Timer trigger TIME!
OK! At this point we are ready to set up all the triggers that will make this timer functional. Here is the logic and you would have to create a trigger for each condition listed here:
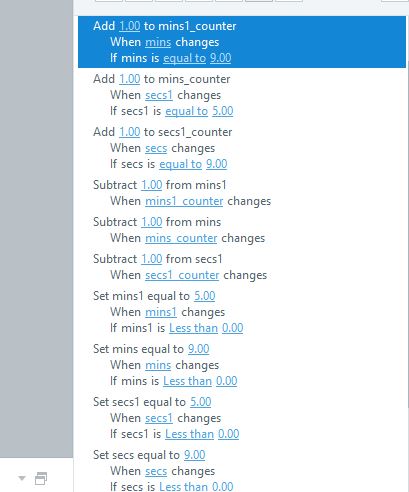
- Add 1 to variable “mins1_counter” when “mins” changes if “mins = 9”
- Add 1 to variable “mins_counter” when “secs1” changes if “secs1=5”
- Add 1 to variable “secs1_counter” when “secs” changes if “secs=9”
- Subtract 1 from variable “secs” when Rectangle1 animation path 1 completes
- Subtract 1 from variable”secs” when Rectangle1 animation path 2 completes
- Subtract 1 from variable “mins1” when “mins1_counter” changes
- Subtract 1 from variable “mins” when “mins_counter” changes
- Subtract 1 from variable “secs1” when “secs1_counter” changes
- Adjust “mins1” = 5 when “mins1<0”
- Adjust “mins” = 9 when “mins<0”
- Adjust “secs1” = 5 when “secs1<0”
- Adjust “secs” = 9 when “secs<0”
- Move Rectangle1 on animation path 3 or STOP when variable “secs” changes and “mins1”, “mins”, “secs1” and “secs” = 0
Wheew! At this point you can CTRL+S your project, close the master view and preview this timer as it should work like a dream. Pay close attention to the order of the triggers as it’s very important. Otherwise, the timer may jump from 01:00 to 00:49 instead of 00:59
Controlling the timer
If you notice, right now the timer will start even if is set at 00:00. We can control this with a True or False variable aptly named “TimerOn”. The variable default value is “False”, but if any of the timer variables is greater than zero, then it would switch to “True” which would trigger the motion path loop to begin. Here’s how to set this up.
- Create True or False variable “TimerOn” with default value of “False”
- Go back to slide master and add a trigger to adjust variable “TimerOn= True” when “mins1” or “mins” or “secs1” or “secs” is greater than zero
- Find the Rectangle1 trigger that reads “Move Rectangle1 when timeline starts” and change it to move when variable “TimerOn” changes and = True.

Last thoughts
This post you showed you how to create a a four-digit timer in Storyline 360 using a motion path loop from the slide master. However, the fun does not have to end there right? If you want more digits on this timer i.e. hours , then you would just repeat the steps for “mins1” and “mins” variables and ensure that the “TimerOn” triggers include the new variables. Well, that’s it for now, but go ahead and subscribe so you know when more awesomeness gets dropped on this blog like the SOURCE FILE ; )